In the intricate realm of business automation, NetSuite emerges as a multifaceted tool with a plethora of capabilities. At the heart of this complexity lies NetSuite Workflows – a powerful mechanism to streamline processes and elevate efficiency.
This guide serves as a compass for those seeking to harness the potential of NetSuite Workflows. From defining the essence of NetSuite SuiteFlow and its benefits, to delving into designing, initiating, and mastering various workflows.

Don’t let the complex world of NetSuite Workflows overwhelm you! Continue reading to learn more about the intricacies of building and managing NetSuite Workflows by encapsulating advanced techniques, best practices, and expert tips.
What is NetSuite SuiteFlow?
NetSuite SuiteFlow is a pre-built tool designed for the creation and execution of workflows within the NetSuite platform. It offers a user-friendly interface with point-and-click capabilities, allowing users to customize and optimize their business processes.
By using SuiteFlow, users can efficiently streamline custom workflows, automate powerful functions, and set off workflows through triggering events.
This tool simplifies the creation, editing, and management of various workflow components, including states, actions, conditions, and triggers within the NetSuite system. Proficiency in editing workflows is crucial for NetSuite administrators and developers.
NetSuite developed SuiteFlow to facilitate this skill. Ultimately, SuiteFlow facilitates workflow management, leading to increased business automation and operational efficiency.
What are NetSuite Workflows?
In the context of NetSuite, workflows are a fundamental tool that allows businesses to automate, streamline, and manage their processes more effectively.
Workflows are designed to guide data through a series of defined stages, actions, and conditions, ensuring that tasks are completed in a consistent and efficient manner.
![]()
Automation and Process Management
Workflows serve as a mechanism for automating business processes, reducing manual effort, minimizing errors, and increasing overall efficiency. By defining a set of rules and actions, workflows ensure that tasks are performed consistently and according to predefined criteria.
![]()
Structured Flow of Work
Workflows provide a structured flow for data and tasks to move through various stages. Each stage represents a specific step in the process, and transitions between stages are controlled by conditions and triggers. This structured approach ensures that work progresses in a logical sequence.
![]()
Visual Representation
Workflows are visually represented in the form of flowcharts or diagrams. These visual representations help users understand the workflow's structure, including states, transitions, and conditions. This visual representation makes it easier to design, configure, and manage workflows.
![]()
Customization and Flexibility
NetSuite workflows are highly customizable, allowing businesses to tailor processes to their specific needs. Customization options include defining stages, creating transitions, setting conditions, specifying actions, and more. This flexibility enables workflows to adapt to a wide range of business scenarios.
![]()
Real-Time Monitoring and Reporting
Workflows provide real-time monitoring and reporting capabilities. Users can track the progress of work items, view workflow history, and analyze performance. This visibility into workflow execution helps businesses identify bottlenecks, improve processes, and make informed decisions.
![]()
Role in Business Process Improvement
Workflows play a crucial role in business process improvement efforts. They enable organizations to identify inefficiencies, automate repetitive tasks, enforce best practices, and optimize resource utilization. By continuously refining and optimizing workflows, businesses can achieve higher levels of productivity and operational excellence.
![]()
Adaptability to Changing Needs
Workflows can be easily modified and updated to accommodate changing business requirements. As businesses evolve, workflows can be adjusted to reflect new processes, regulations, or organizational structures, allowing for seamless adaptation to dynamic environments.
![]()
Cross-Functional Integration
Workflows facilitate cross-functional integration by automating processes that involve multiple departments or teams. For example, a sales order approval workflow can involve sales, finance, and management teams, ensuring that all relevant stakeholders are involved in the decision-making process.
Getting Started with NetSuite Workflows
Understanding Workflow Design in NetSuite
In this section, we delve into the essential components and concepts involved in designing workflows within the NetSuite platform. A well-designed workflow can streamline processes and enhance automation, leading to increased efficiency and productivity.
Workflow design hinges on three core elements:
![]()
Workflow States
These represent distinct stages or steps within a workflow. Each state corresponds to a specific point in a process where data or records can reside.
![]()
Transitions
Transitions serve as connectors between workflow states. They determine the logical flow of the process, indicating how data progresses from one state to the next.
![]()
State Actions
Vital functionalities are associated with each workflow state through state actions. These actions define what occurs to the data when it enters a particular state. They are essential for creating functional workflows that drive meaningful actions and outcomes.
To design and configure workflows, NetSuite provides a user-friendly Workflow Designer interface. Here's how to access it:
- For administrators, navigate to the "Customizations" option within NetSuite.
- Under "Customizations," select "Workflow" to access a comprehensive list of enabled or created workflows.
- Clicking on any specific workflow opens the Workflow Designer interface, where you can visually craft and refine your workflow's structure.

How to Create a Basic Workflow in NetSuite
Follow these 6 easy steps to build a basic workflow in NetSuite. As always, if you need help building a workflow, you can contact our team of workflow specialists at any point to lend a hand.
![]()
Step 1: Set Up Custom Fields
- Create custom fields on the customer record, such as "Accounting Status," "Accounting Approval," and "Accounting Approval Date."
- Define values for lists if necessary (e.g., "Pending Approval," "Approved," "Rejected").
![]()
Step 2: Create a Workflow
- Navigate to "Customization" > "Workflows" > "Workflows" and click "New."
- Name the workflow, select the record type as "Customer," and choose "View" as the initiation event.
- Set trigger types to "All."
- Set conditions to control when the workflow action appears (e.g., for specific roles and status conditions).
- Save the workflow.
![]()
Step 3: Define Workflow States and Actions
- Create State 1 with an action to display a custom button, e.g., "Approve."
- Set conditions based on user roles and status.
- Use "Before Record Load" as the trigger and "Before Load" as the event type.
- Save the button action.
- Create State 2 for when the button is clicked.
- Set field value actions for "Accounting Status," "Accounting Approval," and "Accounting Approval Date."
- Populate fields based on your business process, such as changing "Pending Approval" to "Accounting Approved," setting the approval date, and capturing the approver's name.
- Save each field value action.
![]()
Step 4: Configure State Transitions
- Configure a transition from State 1 to State 2.
- Link the transition to the "Approve" button action.
- No specific conditions are needed here.
- Save the transition.
![]()
Step 5: Apply Workflow to Customer Record
- Create a new customer record and fill in the necessary details.
- If you're an authorized user (e.g., administrator or accountant), you'll see the "Approve" button on the customer record.
- Click the "Approve" button to trigger the workflow.
![]()
Step 6: Review Workflow Results
- After clicking "Approve," the workflow will change the "Accounting Status" to "Accounting Approved," set the approval date, and capture the approver's name.
- The customer record will reflect these changes, indicating that the approval process is complete.
Initiating NetSuite Workflows
NetSuite workflows can be initiated based on various events, providing flexibility and adaptability:
![]()
Record Events
Workflows can be triggered when records are viewed, created, or updated, ensuring seamless integration with your existing processes.
![]()
Automatic Scheduling
Automate workflows to run at specific times or intervals, ensuring timely execution of critical tasks.
![]()
Programmatic Execution
Utilize SuiteScript, NetSuite's scripting language, to programmatically trigger workflows. This empowers you to customize and extend automation based on your unique business requirements.
In this section, we will explore the top five NetSuite workflows that can significantly enhance your business processes and streamline operations.
NetSuite's robust workflow automation capabilities empower organizations to automate tasks, approvals, and notifications, ultimately boosting efficiency and productivity.
Below, we delve into the key workflows that can revolutionize how you manage your business using NetSuite.
![]()
A NetSuite Purchase Order (PO) Approval Workflow is a system created to automate and streamline the process of approving purchase orders within NetSuite, an ERP software hosted on the cloud.
This workflow allows businesses to define rules for automated approval of purchase orders based on factors like purchase amount, department, vendor, and item.
The typical sequence of steps in the Purchase Order Approval Workflow may vary based on the company's specific setup and needs. The general process includes:
- Creating the purchase order: The buyer generates a purchase order in NetSuite.
- Initiating the workflow: Saving the purchase order triggers the workflow's start.
- Routing for approval: The workflow directs the purchase order to assigned approvers according to predetermined criteria.
- Approval or rejection: Approvers assess the purchase order and decide whether to approve or reject it.
- Notification: The workflow sends notifications to relevant parties about the approval or rejection.
- Updating PO status: The workflow modifies the purchase order's status to indicate approval or rejection.

PO Workflow Benefits
By automating the purchase order approval process, the NetSuite PO Approval Workflow helps businesses decrease manual errors, enhance efficiency, and ensure adherence to internal rules and external regulations. Businesses can also benefit from:
- Streamlined procurement cycle with automated approval processes.
- Improved supplier relationships and negotiation power.
- Reduced procurement costs and enhanced spend management.
The Sales Order (SO) Workflow automates the entire sales cycle, from order creation to fulfillment. It handles the creation of sales orders, monitors order fulfillment, generates invoices, and tracks payment receipts.
In a typical sales order workflow, you create a sales order from an estimate or you create a new sales order. After the sales order is approved, it enters the fulfillment queue. The approval process of sales orders is determined by your company’s accounting preferences.

SO Workflow Benefits
Automation in this process reduces manual intervention, minimizes errors, and accelerates the cash conversion cycle.
- Faster order processing and fulfillment.
- Reduced errors and improved data accuracy.
- Enhanced visibility into the sales process and revenue tracking.
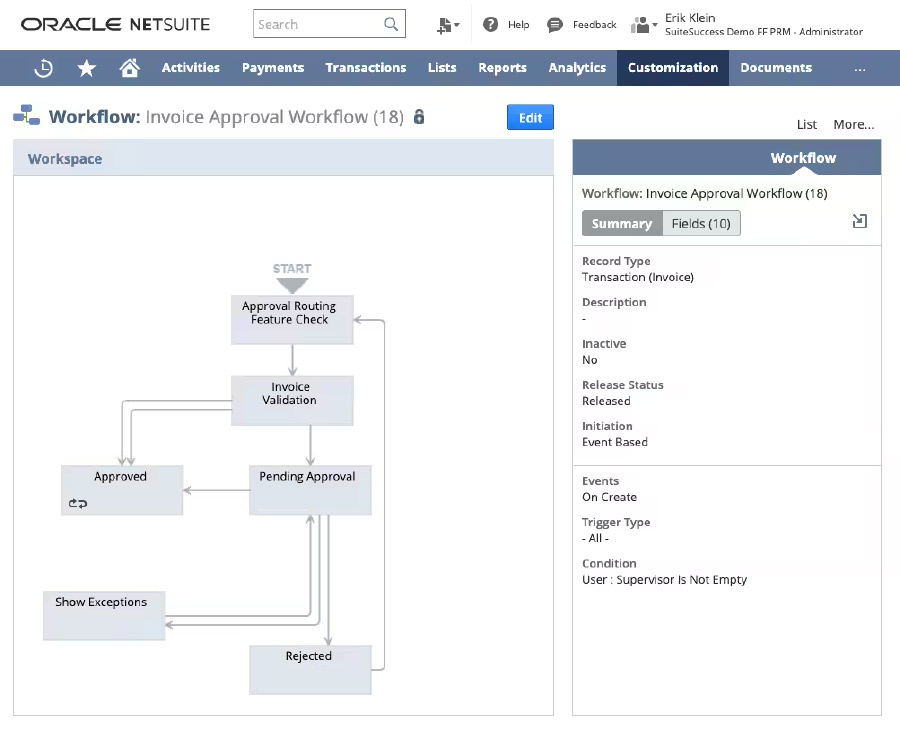
The Invoice Approval Workflow automates the invoicing process, from generation to payment receipt. It ensures timely and accurate invoicing, approval, and recording of customer payments. By automating these tasks, businesses can enhance their cash flow management and provide a seamless billing experience to customers.
This particular workflow adds a layer of complexity as it takes into account various factors, including the invoice amount, user role, and user status. The workflow's decision-making process hinges on these factors to determine whether an approval or rejection is warranted.
It's important to note that an additional validation step ensures the presence of the correct approver before initiating the workflow.
![]()
Invoice Approval Workflow Benefits
Incorporating an Invoice Approval Workflow into your NetSuite implementation not only simplifies intricate approval processes but also brings automation, accuracy, and transparency to your invoice management. Businesses can also benefit from:
- Efficient invoicing and payment tracking.
- Reduced delays in revenue recognition.
- Improved customer satisfaction through timely and accurate billing.
A NetSuite Journal Entry Approval Workflow feature empowers organizations to establish a customizable process for reviewing and endorsing journal entries within the NetSuite system. This specialized workflow guarantees that before being recorded in the general ledger, journal entries undergo scrutiny and approval by designated personnel with appropriate authorization.
With a Journal Entry Approval Workflow, enterprises can tailor approval criteria in alignment with their distinct operational procedures. For instance, enterprises can configure the workflow to mandate approval for journal entries surpassing a specific monetary threshold or those impacting designated accounts.

Journal Entry Workflow Benefits
Incorporating the Journal Entry Approval Workflow within NetSuite empowers businesses with these key advantages, fostering precise financial management, streamlined processes, and rigorous compliance measures. You can also take advantage of:
- Simplified and standardized journal entry creation and approval.
- Improved accuracy in financial reporting.
- Faster month-end and year-end closing processes.
The Lead Nurturing Workflow automates the process of nurturing leads and guiding them through the sales funnel. It involves automated communication, follow-ups, and tracking of lead interactions.
Here’s an example of a basic lead nurturing workflow. It begins with the following fundamental stages once a lead is generated within NetSuite, and for this example the lead belongs to the software sector:
- Dispatch an invitation for a webinar. The workflow transmits an invitation to the lead, inviting them to participate in a webinar titled "Current Trends in Internet Security," accompanied by a hyperlink to an online registration form.
- Should the lead not react to the webinar invitation within a span of 14 days, the workflow dispatches an email message labeled "Top Internet Security Services," and subsequently concludes.
- In case the lead responds positively to the webinar invitation, the workflow enters a one-day pause prior to proceeding to the subsequent phase.
- Dispatch an email containing a case study. The workflow sends an email containing a link to a comprehensive case study outlining NetSuite' security offerings.
- Should the lead neglect to click on the case study link, the workflow, after a lapse of 7 days, sends an email presenting a free trial proposition, subsequently reaching its conclusion.
- Upon the lead's engagement with the case study link, the workflow enters a 3-day pause before advancing to the subsequent phase.
- Send an email comprising a customer testimonial. The workflow conveys an email featuring a testimonial from a satisfied customer, ultimately concluding the process.
Lead Nurturing Workflow Benefits
By automating lead nurturing, businesses can improve conversion rates and ensure a consistent and personalized experience for potential customers. Businesses can benefit from:
- Enhanced lead engagement and conversion.
- Timely and relevant communication with leads.
- Improved alignment between sales and marketing teams.
Advanced Workflow Techniques
Best Practices for NetSuite Workflows
Here are some of the best-practices you should follow when creating and initiating workflows within NetSuite:
![]()
Conditions and Expressions
Conditions are used to evaluate specific criteria and determine the path a workflow should follow. Workflows can, and should, include conditional branches that guide the process based on factors such as record attributes or user-defined values. Expressions allow for complex logic to be built into conditions.
![]()
Record Types and Custom Records
Workflows can be associated with specific record types, such as customers, sales orders, invoices, and custom records. This allows businesses to tailor workflows to their unique processes and data structures.
![]()
Workflow Roles and Permissions
Workflow roles determine who has the authority to initiate, interact with, or modify workflows. Roles can be assigned to specific users or user groups, ensuring that only authorized individuals can execute workflow actions.
![]()
Workflow Routing and Approval
Workflows can be designed to route records for approval based on predefined criteria. Approvers can receive notifications and make decisions directly within the workflow, ensuring a streamlined approval process.
![]()
Workflow Testing and Debugging
NetSuite provides tools for testing and debugging workflows to ensure they behave as expected. Testing can involve simulating triggers, evaluating conditions, and previewing workflow actions before deployment.
![]()
Workflow Management and Monitoring
Businesses can monitor the status of active workflows, review workflow history, and track the progression of records through different stages. Monitoring tools provide visibility into workflow performance and help identify any issues.
Advanced NetSuite Workflow Triggers
At the heart of NetSuite workflows lies the concept of triggers – event-driven actions that dictate when specific tasks should be executed during the processing of records.
Triggers define the moments when workflows come to life, performing actions and guiding record transitions.
Here are the two fundamental types of triggers in SuiteFlow:
![]()
Server Triggers
Server triggers are the backbone of SuiteFlow, activating workflows based on various events in the record processing lifecycle. They ensure that your workflows respond to specific occurrences with precision and efficiency. Server triggers encompass three primary categories:
Record Based Triggers
- Before Record Load: Initiates actions and transitions before a record is loaded into the browser. Useful for setting default values, hiding fields, or record locking.
- Before Record Submit: Executes prior to saving a record to the database. Ideal for validating field values or performing calculations before saving.
- After Record Submit: Activates after a record is saved to the database. Suitable for sending notifications or creating dependent records.
Workflow Based Triggers
- On Entry: Triggers actions when a workflow enters a state for the first time alongside the first server trigger. Enables initial state-specific tasks.
- On Exit: Executes actions when a workflow transitions out of a state to another. Facilitates seamless state transitions.
Time Based Triggers
- Scheduled: Enables workflows to initiate, and actions/transitions to execute, according to user-defined schedules. Offers advanced automation possibilities.
![]()
Client Triggers
Client triggers come into play when users interact with NetSuite record forms. These triggers enhance user engagement and streamline data input. Here are the key client triggers:
-
Before User Edit:
Executes as the record form loads, allowing changes before any user edits.
-
Before Field Edit:
Activates when users move away from a field after input. Perfect for validating field values.
-
After Field Edit:
Initiates after a user modifies a field's value. Useful for dynamic updates based on field changes.
-
After Field Sourcing:
Triggers after a field change and sourcing of child field values. Helpful for setting values based on sourced data.
-
Before User Submit:
Executes before data is sent to the NetSuite database upon user form submission. Ideal for validating field values.
NetSuite workflows event types are the key to initiating actions and transitions in response to specific events. By understanding and utilizing event types effectively, you can create workflows that seamlessly integrate with user interactions and system activities.
SuiteFlow offers a diverse range of event types, each corresponding to a unique user interface activity for creating, viewing, or updating records.
To effectively utilize event types, adhere to the following rules and guidelines:
![]()
- The Event Types field is available for actions and transitions triggered by server events but not for client triggers or the Scheduled trigger.
- While the Workflow Manager doesn't limit all relationships between "On Create" and "On Update" triggers and corresponding events, careful consideration is required to ensure compatibility.
- Selecting event types like "View" for workflow initiation allows customization, but remember that the view event occurs in read-only mode, potentially influencing your workflow initiation conditions.
Here is a complete list of event types within NetSuite workflows.
Custom Actions Within NetSuite Workflows
A Custom Action in NetSuite is a type of workflow action that allows you to define and execute custom logic using SuiteScript. This enables you to create tailored automation steps that go beyond the built-in workflow actions.
SuiteScript is NetSuite's scripting language that allows you to customize and extend NetSuite's capabilities. Workflow Action Scripts, written in SuiteScript, provide the functionality for Custom Actions.
To create a Custom Action, you'll need to follow a few key steps:
![]()
Step 1: Create and Deploy a Workflow Action Script
First, you need to define the functionality of your Custom Action using SuiteScript in a Workflow Action script. This script will determine what actions are taken when the Custom Action is executed.
![]()
Step 2: Adding a New Custom Action
- Open the Workflow Manager.
- Create a new action.
- If your Workflow Action script is deployed for the base record type of the workflow, your Custom Action will be available in the "New Action" window.
![]()
Step 3: Configuring Custom Action Properties
When creating a Custom Action, you'll configure its properties, including:
- Basic Properties: Name, Description, etc.
- Condition: Define conditions that determine when the Custom Action should be executed.
- Schedule: Set when the Custom Action should run.
![]()
Custom Action Limits
When creating Custom Actions, be mindful of the following limits:
- Time Limit: 300 seconds (5 minutes) for execution.
- Line Limit: 100,000,000 lines of code.
- Unit Limit: 1,000 units.
Please Note: These limits apply to each instance of a Custom Action within a workflow.
NetSuite allows the nesting of workflows, a powerful feature that enables one workflow to call another. This "workflow chaining" facilitates the creation of intricate automation scenarios, where multiple workflows collaborate and interact in a coordinated manner.
Workflow nesting happens when you add a custom action to a workflow that causes one “parent” workflow to call upon a second “child” workflow. Typically, nested workflows run independently of the parent workflow that submitted them.
Visit this page to see examples of a parent workflow calling a child workflow, and of child workflows as well.

NetSuite Workflows Tips and Tricks
SuiteFlow For Sweet Flows: Improving Your Workflows with NetSuite SuiteFlow
Now that you know the basics of building workflows, you may be looking for a way to properly manage them. Don’t worry - NetSuite has you covered! NetSuite's SuiteFlow introduces a fresh perspective on ERP workflows beyond traditional approval workflows.
This dynamic workflow management system enables businesses to automate tasks like approvals, alerts, and record updates, significantly enhancing overall operational efficiency. The user-friendly, point-and-click interface empowers users to design and manage workflows effortlessly.
![]()
Streamlined Approvals and Intelligent Processes
SuiteFlow in NetSuite comes with pre-configured approval workflows that simplify tasks across the system. When an employee is added to NetSuite, they're connected to supervisors and business roles, forming the basis for defining workflow approvers.
Take the example of an accounts payable clerk who initiates a bill for approval. This triggers an automated process where the bill moves through stages, involving approvals and notifications, all meticulously tracked for a transparent audit trail.
![]()
Automation for Enhanced Accuracy and Operational Excellence
The potential of SuiteFlow extends beyond approvals. It automates crucial business processes, like credit holds and notifications for overdue customer accounts.
By leveraging saved searches and scheduled workflows, businesses can seamlessly enforce rules, update records, and communicate vital information. SuiteFlow's impact isn't confined to approvals; it's a powerful tool for data accuracy, reducing manual errors and saving valuable time.
Incorporating SuiteFlow within NetSuite elevates organizations by reducing manual effort, ensuring accurate processes, and boosting overall operational efficacy. It's a transformative solution that aligns perfectly with the dynamic demands of modern businesses.
Top Workflow Management Tips
Are you looking to optimize your NetSuite experience through streamlined workflow configuration?
We've compiled a set of best practices to ensure your workflow customization is efficient and effective. From execution conditions to script and workflow interactions, these tips will guide you in harnessing the full power of NetSuite workflows:
![]()
Execution Using Specific Conditions and Context
Tailor your workflow triggers to specific execution of conditions and contexts. This enhances data integrity and optimizes NetSuite's performance by activating workflows only when needed.
![]()
Mindful Logging
Enable logging during testing and disable it when your workflow is released to keep file sizes manageable. Note that client-side triggers won't appear in the workflow log.
![]()
Strategic Naming Conventions
Create clear and unique names for IDs, states, actions, and custom fields to avoid conflicts, especially when dealing with bundles or installations.
![]()
Use Administrator Privileges Wisely
Set workflows to execute as administrators only when necessary for accessing privileged records. Overusing administrator privileges can compromise security and data integrity.
![]()
Leverage Scheduled Workflows
Consider using scheduled workflows when triggers at specific times aren't required. Schedule tasks during quieter periods to enhance the user experience, while being mindful of timing and frequency.
![]()
Optimize Approval Workflows
When building approval workflows, find the right balance of states for effectiveness. Utilize native fields like Next Approver and Approval, and prevent re-entry of approved transactions with "Do Not Exit" states or workflow conditions.
![]()
Manage Script and Workflow Execution Order
Keep in mind that scripts trigger before workflows when deploying both. Ensure a clear order of execution to achieve desired outcomes, especially when modifying the same fields.
By adhering to these seven tips, you'll streamline your NetSuite workflow management, optimize performance, and make the most of this powerful tool for your business processes.
Workflow administration through SuiteFlow is a crucial element in effectively managing your business processes within NetSuite. It encompasses a range of tasks aimed at optimizing workflow performance and maintaining control. These tasks include:
- Searching for workflow definitions and instances
- Initiating, processing, and canceling workflows using the Mass Update feature
- Understanding unit usage limits through workflow governance
- Bundling workflows for seamless transfer
- Customizing the retention of workflow instances and historical records
- Efficiently deleting workflow instances and records when needed

The Significance of Workflow Administration
Workflow administration is the backbone of efficient workflow management within NetSuite. It equips you with the tools and knowledge to handle every aspect of your workflows comprehensively.
From ensuring smooth workflow initiation and resource allocation to maintaining historical records and managing the lifecycle of workflow instances, workflow administration empowers you to align your business processes with your goals and resource constraints.
Embracing these practices ensures that your business processes remain agile, adaptable, and optimized for long-term success within the NetSuite ecosystem.
How to Test a Scheduled Workflow
When building a workflow, much like building a saved search in NetSuite, it’s important to test it before saving. Efficiently testing your NetSuite scheduled workflows before implementation is crucial for ensuring their smooth functionality.
Ensure your NetSuite workflows perform seamlessly in your production environment by following these steps:
![]()
Transition to Test Mode
Switch your workflow's "Release Status" to "Testing" to prevent any real-time data interaction during testing.
![]()
Use "Execute Now" Option
Activate the workflow testing by selecting "Execute Now." This triggers the workflow on the first 20 records from your chosen saved search, simulating real-world execution.
![]()
Safe Testing with Sample Data
Protect your data by testing with a limited sample set. Adjust recipients, like emails, to yourself temporarily to avoid unintended interactions.
![]()
Transition Back to Release Mode
Once satisfied, revert the workflow's status to "Released" for live execution as designed.
Additional Resources for NetSuite Workflows
NetSuite Workflows Training
There are several resources available to help with NetSuite workflow training, depending on your specific needs and learning preferences. Here are a few options:
![]()
NetSuite Help Center
The NetSuite Help Center is a valuable hub for comprehensive resources related to NetSuite workflows. It offers a range of materials, including articles, videos, and user guides. To access the Help Center, simply log in to your NetSuite account and click on the Help link located in the upper-right corner.
![]()
SuiteAnswers
SuiteAnswers serves as NetSuite's online knowledge base, containing an extensive collection of articles and responses to common queries about NetSuite functionalities. You can easily locate information about NetSuite workflows by using the search bar on the SuiteAnswers homepage.
![]()
NetSuite User Groups
Engage with NetSuite User Groups, communities of individuals who utilize NetSuite, to share insights and best practices related to workflows and more. These groups are available based on geographic regions or industries. Attend meetings, webinars, and other events focused on NetSuite training to enhance your understanding of workflows.
![]()
NetSuite Training Course
NetSuite provides diverse training courses that cover various aspects of workflows and other NetSuite features. These courses are accessible online, catering to users with varying levels of expertise. Feel free to reach out to us for comprehensive NetSuite training, as we offer immersive hands-on training for your team.
![]()
NetSuite Consultants
Leverage the expertise of NetSuite consultants, such as GURUS, who possess in-depth knowledge of NetSuite and can offer customized training and assistance pertaining to workflows and other NetSuite functionalities.
As a leading NetSuite consulting and implementation partner, GURUS is dedicated to empowering businesses like yours to achieve their utmost potential and facilitate growth. Connect with us using the form on this page to learn how GURUS can contribute to the success of your upcoming projects.
NetSuite Workflows Use-Cases (Issues and Resolutions)
In this section, we will provide specific use-case issues we’ve come across at GURUS with our in-house solutions. These issues were brought forward either from past clients or from our own consultants.
Rejection Reason in an Approval Workflow
Issue:
Some clients require a rejection reason to be provided when a record is rejected during an approval workflow. The following will allow accomplishing this via workflow, and could also be used if the client wants to have approval comments added to the record by the approver.
Resolution:
1. Create a custom record for Rejection Reason. Disable "allow quick create" and "include name field" and set the default access level to Create. Include at least the following fields:
- A list/record field called Rejected Record. The list/record will be the record type in the approval workflow. Check "Record is Parent" for this field. This will make a sublist of rejection reasons on the record being rejected.
- A text area field and/or a list/record field for rejection reason. The text area allows for detailed explanations. The list/record field allows for better reporting by selecting from a pre-determined list. Including both increases effort but also provides both benefits. This field should be mandatory.
2. Create a workflow field for Rejection Reason in the approval workflow. This should be a list/record field using the Rejection Reason custom record.
3. Add a state to the workflow called Create Rejection Reason between the pending approval state and the rejected state. Create and subscribe to record following steps in SuiteAnswer 40519:
- Create Record action to create the rejection reason. Store the new record in the Rejection Reason workflow field. Set the internal ID of the record in the Rejected Record field.
- Subscribe to Record action using the Rejection Reason workflow field.
- Go to Record action going to the Rejection Reason workflow field in edit mode.
4. Add another state to the workflow between the Create Rejection Reason state and the Rejected state called Record Rejection Reason.
The transition from Create Rejection Reason to Record Rejection Reason should be conditional upon the field Rejection Reason from the record Rejection Reason (workflow) not being empty.
In the Record Rejection Reason state include a set field value action setting the field where you wish to record the rejection reason equal to the field on the custom record.
5. Make the transition from the Record Rejection Reason state to the Rejected state conditional on the field where the rejection reason is being recorded not being empty.
6. In the Rejected state add a Set Field Value action setting the Rejection Reason workflow field to null. This will allow for the record to be rejected multiple times with a new rejection reason being generated each time.
Create a Vendor Record Using an Online Form
Issue:
A client works with a large number of independent contractors and needs a way to create vendor records automatically from data submitted by the contractors.
Resolution:
1. Create a custom record with all necessary fields needed to create a vendor record.
2. Create an online form on the custom record.
3. Create a workflow using the following information:
a. Record Type: Custom record
b. Initiation: Event-based
c. Event Definition: On create
d. Trigger Type: After Record Submit
4. Create a new state using the following information:
a. Trigger on: After Record Submit
b. Record Type: Vendor
c. Match the fields from custom record to vendor record (see example below)
5. Click Save
Internal Control Issues:
1. Unauthorized access: If the form link is available to everyone, there's a risk of unauthorized individuals accessing and submitting the form therefore creating fradulent vendors. Implementing an approval
2. Data Integrity: Without proper controls, malicious users could manipulate the data being submitted.
3. Duplicate Entries: Lack of validation mechanisms could lead to duplicate vendor records being created, causing confusion and inefficiency in vendor management.
Internal Control Solution:
Implement an approval workflow on the custom record before the vendor record is created (or updated, as appropriate).
Create a Transaction Record via Workflow
Issue:
A client would like to create vendor bill record automatically from the purchase order with no manual intervention.
Resolution:
Create vendor bill using workflow manager
Steps:
1. Create a saved search named: [Workflow] Bill Purchase Order with the following criteria:
a. Status: Purchase Order: Pending Bill
b. Main Line: True
2. Create a workflow with the following details:
a. Record Type: Transaction
b. Sub types: Purchase Order
c. Initiation: Scheduled
d. Schedule: Saved search Filter: [Workflow] Bill Purchase Order
e. Schedule: Frequency: Every 30 minutes
3. Create a State with the following details:
a. Type: Transform Record
b. Trigger on: Entry
c. Parameters: Record type: Vendor Bill
d. Click Save
Note: The transform record can be used to create the following transaction record automatically:
- Assembly Build
- Cash Sale
- Estimate
- Invoice
- Opportunity
- Purchase Order
- Return Authorization
- Sales Order
- Vendor Bill
- Vendor Return Authorization
- Work Order
Pay When Paid via Subscribe-to-Record Action Workflow
Issue:
A client wants to a pay vendor bill only after the customer has paid their invoices in full. The client uses a special order item to create an Sales Order (SO) which automatically creates a Purchase Order (PO). SO and PO are both related records.
Resolution:
We created a subscribe to record workflow using the following steps:
Custom field: Related Invoice ID
Steps:
1. Create a transaction body field by going to Customization > List, Records & Fields > Transaction Body Field > New
2. Enter the following details:
a: Label: Related Invoice ID
b: ID: custbodygs_relatedinvoice
c: Type: Free-Form Text
d: Applies To: Purchase
e: Validation & Defaulting > Field > Created From
3. Click Save
Custom field: Invoice Number
Steps:
1. Create a transaction body field by going to Customization > List, Records & Fields > Transaction Body Field > New
2. Enter the following details:
a: Label: Invoice Number
b: ID: custbodygs_invoicenumber
c: Type: List/Record
d: List/Record: Transaction
e: Store Value: Checked
f: Applies To: Purchase
3. Click Save
Saved Search: [Custom Field] Created From PO
Steps:
1. Create a Saved Search by going to Reports > Saved Search > All saved searches > New
2. Select Transaction as the saved search type
3. Enter search title: [Custom Field] Created From PO
4. Enter the following criteria:
a: Type: is Purchase Order
b: Applying Transaction: Type: is Bill
5. Enter the following fields for results:
a: Internal ID (Summary Type: Maximum)
b: Applying Transaction
6. Clear all the drill down fields
7. In Subtab Available Filters, add a filter for Applying Transaction and show in filter region
8. Click save
Custom field: PO ID
Steps:
1. Create a transaction body field by going to Customization > List, Records & Fields > Transaction Body Field > New
2. Enter the following details:
a: Label: PO ID
b: ID: custbodygs_po_id
c: Type: Free-Form Text
d: Applies To: Purchase
e: Validation & Defaulting > Search > [Custom Field] Created From PO
3. Click Save
Saved search: [Workflow] PO’s to Set Invoice
Steps:
1. Create a Saved Search by going to Reports > Saved Search > All saved searches > New
2. Select Transaction as the saved search type
3. Enter search title: [Workflow] PO’s to Set Invoice
4. Enter the following criteria:
a: Main Line: is true
b: Type: is Purchase Order
c: Created From: Status: is Sales Order: Billed
d: Invoice Number (custom body): is none
5. Enter the following fields for results:
a: Order Type (also sort by Order Type)
b: *
c: Date
d: As-Of Date
e: Period
f: Tax Period
g: Type
h: Document Number
i: Name
j: Account
k: Memo
l: Amount
6. Clear all the drill down fields
7. Click save
Workflow 1: Set related invoice number on purchase order
Steps:
1. Create workflow by going to Customization > Workflow > Workflows > New
2. Set the following fields on the workflow:
a: Record Type: Transaction
b: Sub Types: Purchase Order
c: Initiation: Scheduled
d: Saved Search Filter: [Workflow] PO’s to Set Invoice
e: Repeat: Checked
f: Frequency: Every 30 minutes
3. Click save
4. Create New workflow field and enter the following details:
a: Label: Sales Order
b: Type: List/Record
c: List/Record: Transaction
d: Store Value: Checked
5. Create a new state and rename it as “SO Invoiced”
6. Create new action and enter the following details:
a: Type: Set Field Value
b: Trigger on: Entry
c: Field: Invoice Number
d: Value: Formula : {custbodygs_relatedinvoice}
7. Click Save
Saved search: [Workflow] Bills with Paid Invoices
Steps:
1. Create a Saved Search by going to Reports > Saved Search > All saved searches > New
2. Select Transaction as the saved search type
3. Enter search title: [Workflow] Bills with Paid Invoices
4. Enter the following criteria:
a: Main Line: is true
b: Type: is Bill
c: Payment Hold: is true
d: Invoice Number: is Invoice: Paid in Full
5. Click save
Workflow: Payment Hold on Bills
Steps:
1. Create workflow by going to Customization > Workflow > Workflows > New
2. Set the following fields on the workflow:
a: Record Type: Transaction
b: Sub Types: Vendor Bill
c: Initiation: Event Based
d: On Create: Checked
e: Trigger Type: Before Record Submit
3. Click save
4. Create New workflow field and enter the following details:
a: Label: Created From PO
b: Type: List/Record
c: List/Record: Transaction
d: Store Value: Checked
5. Create a new state and rename it as “State 1: Bill Created”
6. Create new action and enter the following details:
a: Type: Set Field Value
b: Trigger on: Entry
c: Field: Payment Hold
d: Value: Static Value, Checked: Checked
e: Click Save
7. Create new action and enter the following details:
a: Type: Add Button
b: Trigger on: Before Record Load
c: Label: Release Hold
d: Check Condition Before Execution: Checked
e: Click Save
8. Create new action and enter the following details:
a: Type: Set Field value
b: Trigger on: After Record Submit
e: Field: Created from PO (Workflow)
d: Formula: {custbody_gs_po_id}
e: Click Save
9. Create new action and enter the following details:
a: Type: Subscribe To Record
b: Trigger on: After Record Submit
c: Condition: Created from PO (Workflow) field is Not Empty
d: Field: Created from PO (Workflow)
e: Click Save
10. Create a new state and rename it as “State 3: Manual Release”
11. Create new action and enter the following details:
a: Type: Set Field Value
b: Trigger on: Entry
c: Field: Payment Hold
d: Value: Static Value, Checked: Unchecked
e: Click Save
12. Create a new state and rename it as “State 4: Add Invoice”
13. Create new action and enter the following details:
a: Type: Set Field Value
b: Trigger on: Entry
c: Field: Invoice Number
d: Value: From Field, Record (Join Field): Created from PO (workflow), Field: Invoice Number
e: Click Save
14. Create new action and enter the following details:
a: Type: Add Button
b: Trigger on: Before Record Load
c: Label: Release Hold
d: Check condition before execution: Checked
e: Click Save
15. Create a new state and rename it as “State 2: Invoice Paid”
16. Create new action and enter the following details:
a: Type: Set Field Value
b: Trigger on: Entry
c: Field: Payment Hold
d: Value: Static Value and Unchecked
e: Click Save
17. Create a transition between State 1: Bill Created to State 3: Manual Release
18. Enter the following details:
a: Execute on Button: Release Hold
19. Create a transition between State 1: Bill Created to State 4: Add Invoice
20. Enter the following condition:
a: Record: Created from PO (workflow)
b: Field: Invoice Number
c: Compare Type: not empty
21. Create a transition between State 4: Add Invoice and State 2: Invoice Paid
a: Transition On: Scheduled
b: Enter the following saved search condition: [Workflow] Bills with Paid Invoices
c: Delay : 1 Hour
d: Click Save
Bulk Email to Customers Using Workflow
Issue:
The client requested to send a one-time bulk email to a list of over 700 customers.
Resolution:
This can be accomplished using a one-time scheduled workflow, provided there is a saved search of the customers who should receive the email. The workflow should be a scheduled workflow with the "Repeat" checkbox unchecked and the saved search of entities (customers, vendors, contacts, or partners) to be emailed set as the saved search condition.
The only action required is an email sending from the required contact (must be created as an employee) to the email on the entity record. An email template can be used or a message written by the client can be copied and pasted into the message field.